

Step‑by‑step wood heater installation checklist for UK homeowners
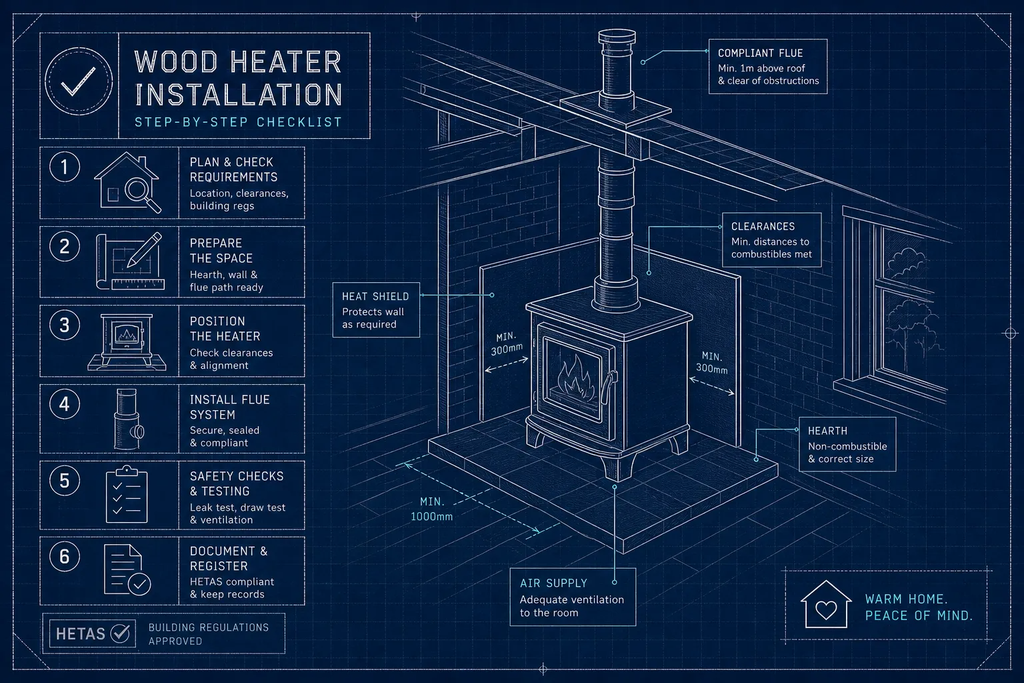
Wood heater installation in a UK home is not a weekend DIY job. Between Building Regulations, HETAS certification, chimney surveys, hearth construction and smoke control rules, there are more steps than most homeowners expect, and skipping any of them can void your home insurance or cause a property sale to stall. The paperwork alone surprises people.
This guide covers the full wood heater installation process in plain English: from assessing your fireplace and sizing your stove correctly, through flue and hearth requirements, to what a HETAS installer actually certifies and what the whole thing costs in 2026. Where relevant, we reference Island Pellet Stoves, our Cardiff-built range of compact, top-flue pellet stoves. Island Pellet Stoves are engineered specifically to fit standard British fireplace openings and are available with a HETAS-certified installation service covering every step described here.
By the end, you will know exactly what is involved, what questions to ask an installer, and how to move forward with confidence.
Assessing your home before installation begins
Is your existing chimney usable?
The first step is not choosing a stove. It is finding out whether your chimney can safely carry one. A sweep and a visual inspection are the starting point, but for properties where the chimney has not been inspected recently, shows signs of staining or has suspected masonry deterioration, a CCTV survey is worth the additional cost: it reveals cracks, collapsed sections, missing mortar joints and incorrect diameters that a mirror inspection misses. Any of these conditions make a chimney unusable without remedial work, regardless of how sound it looks from the outside.
Flue diameter must match the stove’s rated output. For most stoves up to around 5 kW burning wood, a 125 mm flue is acceptable where the appliance specifically permits it; for stoves between 5 kW and 10 kW, Approved Document J requires at least 150 mm. If your existing chimney is wider than the stove needs, a liner sized correctly for the appliance will improve draught and combustion far more reliably than an oversized flue. The term “chimney lining for stove” refers specifically to this process of fitting a correctly sized liner inside an existing masonry chimney stack.
Sizing the stove correctly for your room
Oversizing is one of the most common installation mistakes. A stove that is too large for the room gets run at a low, inefficient output, which causes tar build-up, poor combustion and uncomfortable overheating. The straightforward calculation is: room length × width × height (in metres), divided by an insulation factor of 10 for a draughty older property, 14 for an average UK home, or 24 for a well-insulated modern house.
For a typical living room measuring 5 × 4 × 2.4 m, that is 48 m³. Divide by 14 for an average home and you get 3.4 kW; in a draughty period property the same room needs around 4.8 kW. A 5 kW stove suits that space with room to spare. Choose a stove whose nominal output is close to your calculated figure, not one with headroom for theoretical future use.
Smoke control areas and DEFRA rules
Check with your local council whether your property sits within a Smoke Control Area. If it does, you cannot legally burn ordinary wood unless your appliance holds a DEFRA exemption. A non-exempt wood burner in a Smoke Control Area is an offence under the Clean Air Act, and the restriction applies to the appliance, not just the fuel. Confirm DEFRA exemption status before you choose a stove, not after.
Flue, hearth and ventilation: the three non-negotiables
Chimney liner vs twin-wall flue: which do you need?
A flexible stainless-steel chimney liner is the right choice when you have a structurally sound masonry chimney with a clear, reasonably straight route. It is less disruptive than the alternative, corrects an oversized flue diameter, seals cracks and protects the masonry from acidic condensates. For solid fuel and wood-burning stove installation, 316Ti stainless steel is the commonly specified grade; 904L is used for more demanding fuels or where a longer warranty is required.
Twin-wall insulated flue becomes necessary when there is no usable chimney, when the existing stack has collapsed or has impossible bends, or when a new external route is simpler than remedial work on the existing structure. It costs more and is more visually prominent, but it provides a complete new chimney system where one is needed. Your installer should advise which route suits your property after inspecting the chimney, not before.
Hearth dimensions and clearances under Approved Document J
For a freestanding stove, the non-combustible hearth must be at least 840 × 840 mm, extending at least 300 mm in front of the appliance and 150 mm at each side. Where the stove sits over combustible flooring, the constructional hearth beneath must be at least 125 mm deep. These are the regulatory minimums; the stove manufacturer’s specified clearances take precedence if they are larger, and they frequently are.
Clearances from combustible walls vary substantially by model, but common manufacturer figures run to 150, 300 mm at the rear and 300, 600 mm at the sides. A single-wall connecting flue typically needs a clearance equal to at least three times its internal diameter from any combustible material. These numbers are not suggestions. They are the distances at which the stove and flue have been tested to operate safely.
Ventilation requirements by stove output
The 5 kW threshold is important. In a normally ventilated UK dwelling, a stove rated at 5 kW or below does not require a dedicated permanent air vent. Above 5 kW, you need 550 mm² of permanently open free area for every kilowatt above that threshold. For an 8 kW stove in an average semi-detached house, that works out to 1,650 mm² of free area. In a particularly airtight home with an air permeability of 5 m³/h/m² or less, the calculation runs from the full rated output rather than just the amount above 5 kW, giving 4,400 mm² for the same 8 kW stove.
Check your home’s construction type before specifying ventilation: the difference between these two calculations is significant, and getting it wrong creates both a compliance problem and a practical combustion problem.
Traditional log burner vs wood pellet stove: how installation differs
Where the installation process diverges
A traditional log burner operates as an open-flue system. It draws combustion air from the room, relies on chimney draught, requires manual fuel loading and regular ash removal, and demands a visible, permanent air supply. The wood-burning stove installation process reflects that dependency: chimney sizing, draught calculations and room ventilation are all critical variables that need careful assessment before the stove is even positioned.
A wood pellet stove operates quite differently. Fuel feeds automatically from a hopper, combustion gases vent through a smaller concentric flue, and the sealed combustion system means no smoke enters the room. The pellet stove is far less sensitive to room depressurisation and extractor fans precisely because it draws its combustion air from outside through the flue, not from the living space.
Why pellet stoves are often simpler to fit into existing UK fireplaces
Island Pellet Stoves are built in Cardiff with a top-mounted flue and compact dimensions engineered specifically to sit within a standard British fireplace opening without structural modification. The sealed combustion system avoids the draught-dependency issues of open-flue log burners, and a finned-tube heat exchanger is designed to encourage natural convection rather than relying on noisy fans, which simplifies both installation and long-term maintenance. The stoves are Ecodesign-compliant with significantly lower emissions than conventional wood burners; check the DEFRA exemption register to confirm use in Smoke Control Areas for your specific model.
The step-by-step wood heater installation checklist
This is the practical core of the wood heater installation process. Follow this sequence whether you are overseeing a professional installation or completing pre-installation homework. It covers three stages: what to do before the installer arrives, what happens on the day, and what you should receive at sign-off.
Before your wood heater installation: what to confirm first
- Check Smoke Control Area status with your local council
- Have the chimney swept and surveyed (CCTV where defects are suspected or the chimney has not been recently inspected)
- Confirm stove output matches your room heat loss calculation
- Select an Ecodesign-compliant appliance; confirm DEFRA exemption status if required
- Check hearth dimensions and material; arrange any preparatory construction work
- Book a HETAS-registered installer and verify their registration covers the correct appliance category for your stove type
On the day of installation
The installer works through a defined sequence: fitting the register plate and liner (or twin-wall flue sections), positioning the stove on the prepared hearth, connecting the flue, then commissioning the appliance with a test fire to check draw, combustion and carbon-monoxide alarm function. This is not a process to accelerate. Each stage needs to be correct before the next begins.
A key point worth knowing: a HETAS-registered installer self-certifies the work and notifies both HETAS and the local authority on your behalf. You do not need a separate Building Control application when a registered installer carries out the work in England and Wales, that notification is part of what you are paying for. If your property is in Scotland or Northern Ireland, building control processes differ, so check local requirements with your installer.
What you receive at sign-off
At completion, you should receive a HETAS Certificate of Compliance, the appliance manufacturer’s documentation, a commissioning record, and written confirmation that the carbon-monoxide alarm has been tested. Keep these documents with your property records. They are required by insurers, referenced during remortgaging, and requested as standard during property sales. An installation without them is a liability, not a convenience.
What does wood heater installation cost in the UK?
Cost ranges by installation scenario
The three most common scenarios in 2026 sit within these ranges. An existing sound chimney requiring no new liner: £1,800, £3,000 in total. An existing chimney requiring a new flexible liner: £2,500, £4,500. No chimney at all, with twin-wall flue required: £3,000, £5,500 or more, depending on height, route and scaffolding requirements.
The main cost components break down roughly as follows: the stove itself (£400, £2,500 depending on model and output), a chimney liner fitted (£700, £2,500 including labour and access), installation labour and certification (£300, £900 for stove fitting alone, or £1,000, £2,000 for a full job including survey and commissioning), hearth and finishing work (£100, £1,000), and scaffolding where roof access is needed (£400, £1,200). Unusually complex structural work sits outside these figures and needs a site-specific quotation.
All-in packages: what to look for
A properly scoped all-in quote should include the stove, all flue components, installation, HETAS certification and a post-install handover session. Any quote that omits certification or handover is worth querying before you commit. Island Pellet Stoves’ all-in packages start from £4,950 and cover the stove, flue pipes, installation, HETAS certificate and a personal training session so you understand exactly how to run your stove efficiently from day one. When comparing quotes from any installer, use those components as your checklist: stove, flue, fitting, certification and handover.
Choosing an installer and what happens after the first fire
How to verify a HETAS installer before you commit
HETAS registration is searchable on the HETAS website. Installers hold registration for specific categories of work: Category 1 covers wood-only stoves, Category 2 covers solid-fuel and multifuel appliances, Category 4 covers stoves connected to radiators or hot water, and Category 6 covers dry pellet stoves. Confirm in writing that your installer’s registration covers the exact category for your appliance before any deposit changes hands.
One rule that catches people out: a HETAS installer can only certify work they have personally carried out. They cannot retrospectively sign off a DIY installation or work done by an unregistered fitter. If you are considering any self-installation, be clear that you will need to go through Building Control rather than the HETAS competent-person route, and factor in the associated inspection costs and process.
Post-install training and ongoing maintenance
A proper handover session should cover how to operate the timer and fuel controls, how to set combustion correctly, safe fuel storage, minimum sweeping frequency (typically annually for a pellet stove; frequency for wood burners depends on use, fuel and appliance and is often higher), and what to do if the carbon-monoxide alarm sounds. This is not optional information delivered as an afterthought. Running a stove incorrectly in the first weeks shortens its lifespan and reduces its efficiency significantly. Island Pellet Stoves includes a personal training session with every installation, so you are not left to work things out on the first morning you use it.
Getting this right from the start
Wood heater installation in the UK is straightforward when approached in the correct order: survey first, select the right appliance and flue system, confirm hearth and ventilation requirements, then engage a registered HETAS installer. Cutting corners on any one of those stages creates legal, insurance and safety risk that outlasts the convenience of saving time or money at the outset.
For homeowners who want the warmth and ambience of a real flame without the smoke, noise or complexity of a traditional log burner, Island Pellet Stoves offers a complete route: a Cardiff-designed stove that fits a standard British fireplace, HETAS-certified installation, and a personal training session on the day we hand over. The process is handled from survey through to certification, so nothing is left for you to chase.
If you are ready to find out whether your fireplace is suitable and what installing a wood heater would involve for your specific home, get in touch with our team for a no-obligation survey. We will give you a straight answer.